Paper tube Hot Chocolate Ornament
WHAT YOU NEED:
-
PT tubes (1 tube made 5 ornaments).
-
Scrap white paper (both card stock and regular old printer paper)
-
Scrap brown paper the color of yummy hot chocolate
-
Cardboard- (the kind that comes in the back of notebooks and drawing pads).
-
Scraps of coffee filters (the ruffly ends about half and inch wide)
-
Red and white striped drinking straw
-
Mod Podge
-
Glue
-
Small amount of water in a plastic cup
-
String or embroidery floss to hang the ornament from
-
Craft Knife
-
Needle Tool
INSTRUCTIONS:
I started by cutting my tube into 5 segments. I eyeballed the size to what I thought would be a good mini mug height. Next I cut some circles from my scrap cardboard.
Each mug needs two circles. One that’s the same size as the PT tube, which I made by tracing around the tube. The second, smaller circle, should fit inside the tub. Make those by tracing the inside of the tube.

The large circle is glued to the the bottom of the tube

The small circle is glued onto a piece of brown paper that’s larger on all sides than the cardboard circle.
While those are drying it’s a nice time to cut the white card stock. First you need a band that’s long enough to wrap completely around the tube. You also need the band to be wider than the height of the mug. So if you’re mug is 3 inches high cut your band 3.5 or 4 inches wide.
You’ll also need a white card stock circle the same size as the circle glued on the bottom of the tube.
Once the glue on the tube is dry use Mod Podge to cover the outside with your band of white paper. Be sure to let the paper overhang on the top and bottom edges.

Next cut fringe around the paper on the top and bottom so it will wrap around the tube easily.

Wrap the paper onto the bottom and over the top. Again using Mod Podge to adhere the paper.


Once the tube is dry you can glue the circle on the bottom and cover up the wrapped paper ends.

Now back to the small circle glued to the brown paper. Cut generously around the cardboard disc and fringe the excess paper the same way you did on the tube.


Once both the disc and the tube are dry put some glue around the edge of the disc and insert it into the top of the mug. This might take a few tries- don’ worry if the “hot chocolate” disc isn’t exactly even in the mug… it won’t make a difference in the cuteness of the finished ornament.

Then use your needle tool to make a small hole near the top of the mug. so you’ll able to hang your finished ornament. I made mine near the seam of the paper because it was easy for me to remember that’s where I wanted my handle to be.

Then use your needle tool to make a small hole near the top of the mug. so you’ll able to hang your finished ornament. I made mine near the seam of the paper because it was easy for me to remember that’s where I wanted my handle to be.

Cuve it into a “C” shape and set aside to dry (I let mine dry overnight). To keep the shape I used push pins in some styrofoam


Once the handles are dry use a craft knife to cut the ends at and angle so they fit against the mug nicely. Glue the handles into place.


Once the handle are dry, give the entire mug a coat of Mod Podge.

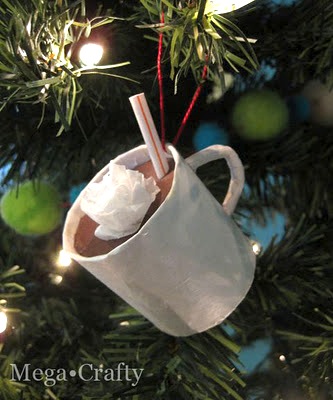
Last but not least- to make them look more like hot chocolate and less like coffee I added whipped cream and a peppermint stick.
The whipped cream is a bit a coffee filter rolled into a rosette-like shape and glued onto the top.

The peppermint stick is made from a red and white straw.

First I cut it into the lengths I needed, and glue them to a scrap of white paper. Once the glue was dry I trimmed around the straws. The white circle of paper closed the tip straw and made it look solid like a peppermint stick


The other end was cut at an angle and glued onto the surface of the hot chocolate.

Add a hanger (I used red embroidery floss that I had leftover from my other ornament projects) and you have yourself some cute (and free) upcycled ornaments!
Total taken from my budget was zero… so I still have $5.27
Thanks a million MegaCrafty.com for this amazing DIY project!